Showing posts with label Real Techniques. Show all posts

Saturday, 6 June 2015

REAL TECHNIQUES SCULPTING SET REVIEW

There isn't a day that goes by when I don't use at the very least, one Real Techniques brush while doing my make up. Some of them are even holy grail brushes that I struggle to do my make up without. I can't even remember when I first bought them, but it was definitely a long time ago and they still work just as well as they first did. I love them because they work really well, are so affordable and easy to get hold of. The set contains three brushes; the sculpting brush, the fan brush and the setting brush. 

The Setting brush had been on my wish list for ages and was one of the main reasons I bought the set. I like to use it mostly to set my under eye concealer as it's so soft it doesn't irritate the under eye, it's also the perfect size as it's not too big. I also tried to use it to contour my cheek bones and it worked well for that as it's small enough to make a defined contour, I liked it but it's not something I do everyday so it's not my main use for it. I think it would be great for touching up make up throughout the day, to add powder where you need it, but I don't ever touch up my make up as I'm either too busy or just cant be bothered. 
The next brush is the Sculpting brush. It's intended to be used to contour, It works pretty well as a 'in a hurry' contour brush as it applies the product but is also big and fluffy enough to blend it in. I find it a little too big for a more precise and sculpted contour. I've been mostly using it for foundation as I saw Sam and Nic use it for foundation (reading that back over sounded so "I saw Regina George..." - Mean Girls). It is so good for foundation; it's fluffy but at the same time dense enough to make it perfect for blending out the foundation really quickly. I think it would also work great for cream blushers and bronzers. Now that I'm writing this, I also think it would be prefect for my beloved Bare Minerals Ready foundation. *Hugely regretting washing my brushes now as I really want to try this!* 
The final brush in the set is the Fan brush. I already have one fan brush so I wasn't too excited for this one as really, how many do you need? I now take that back obviously! I watched the tutorial where Nic spoke about how to use these brushes and she used this one to contour the nose, which I had never thought of and it works so well as it's such a fine brush that it doesn't apply too much product. I also like it for applying highlighter, for this reason, as it's a lot finer than my other fan brush, which works well for this time of year when my skin gets more...lets say 'glowy,' so just a subtle highlight is all that's needed. 
Overall, I'm really pleased with this set and enjoy using all three brushes, so it was a good purchase. I still have a few Real Techniques brushes on the wish list but I am satisfied for now! Have you tried these brushes, which are your favourites? 


Sunday, 2 November 2014

HOLY GRAIL: EYE BRUSHES

Here we have round two of my holy grail brushes and this time I'm talking specifically about eye brushes. If you want to know my holy grail complexion brushes you can read my post 'here.' 
I don't use every brush mentioned, every single time that I do my make up, so they are not all essentials, but if I were to choose my favourites and most used it would be all of these. 

Brushes for packing on colour to the lid
The Urban Decay shadow brush is flat enough to pack colour onto the lid , with as little fall down as possible. The Bare minerals flat shadow end of the precision brush is also good to apply colour to the lid, it's a little thicker than the Urban Decay one, so it also blends shadow out a little more. 

Brushes for crease/blending
First, I use the Sigma E40 to apply colour to the crease. It's so big and fluffy that it makes it so quick and easy to apply colour and it blends all eye shadow so flawlessly. I then use the Sigma E25 for more precise crease blending and to add maybe a darker colour and blend it into the transition shade applied with the E40. If I want something even more precise I'll use the Real Techniques domed Shadow brush as it has a tapered end and is thinner than the E25. 


Brushes for the lower lash line
I like to use either the Models Own Blending brush to apply colour to the lower lash line as it's small enough and blends easily. I also like to use the smaller pencil brush side of the Bare Minerals double ended precision brush as it's really soft so doesn't irritate the eye. If I want to smoke the shadow out even more I'll use a fluffier brush like the Sigma E25. For definition under the eye, I use the Real Techniques accent brush as it's very dense, making it perfect for applying colour closely to the lash line. 

Brushes for the brows
I always use the Sigma E75 for my brows as it's small and dense enough to give great definition to the brows, while making it easy to control the amount of product you apply. 


Brushes for gel liner 
I received the Sigma E05 brush as a free gift with my Sigma order and it fast became my go to gel liner brush. I find it easier to use than angled brushes as it gives more precision.  


So, that is all of my favourite brushes to use for eye make up. Let me know if you have any amazing holy grail eye brushes that I need to try! 


Sunday, 12 October 2014

HOLY GRAIL: COMPLEXION BRUSHES

Only 2-3 years ago all I owned in the brush department was a few scratchy brushes. Fast forward and brushes have become some kind of obsession for me now and I still feel like I want/need more, even though I now have so many that I actually have to sit there and chose which foundation brush I want to use today. I thought I would share some of my favourite complexion brushes. These are the brushes that I find myself reaching for most. 
Clock-wise: Real Techniques Miracle Complexion Sponge, Real Techniques Duo Fiber Powder, Urban Decay Powder, Bare Minerals Fan Brush, Sigma F80, Bare Minerals Blush Brush, Real Techniques Domed Shadow, Real Techniques Duo Fiber Contour, Real Techniques Blush Brush.

Sigma F80 
I use this brush for foundation as it's so good at packing on the product in a stippling motion, to achieve a good amount of coverage. The denseness of it makes it really easy to buff the remaining product into the skin, without any streaky lines or anything. 

Real Techniques Duo Fiber - Powder
I completely adore this brush, so much so that I want another one! I like to use it mostly for bronzer to lightly contour and warm up the skin. The shape makes it so easy to apply bronzer as it's quite thin yet fluffy? It applies the product really evenly as it really buffs it into the skin, so you're not left with any harsh lines like you can be with a more dense brush. I also use this for powder, as it allows you to apply a light amount to set your foundation, without a heavy amount being applied.

Real Techniques Duo Fiber - Contour 
It's just hit me that I feel like I haven't found 'the one' when it comes to contour brushes. This brush is classified as being a contour brush, however I never use it for that, I can't even remember how it worked for contouring as obviously at some point I must have tried it... I may have to re visit this brush for contouring! Anyway, I always use this brush to set my under eye concealer, it works amazingly as like the other duo fiber, it allows you to buff on the product lightly so it never looks cakey at all. It's also soft enough to not irritate the under eye or move the underneath concealer. I cannot do my make up without this brush! 

Bare Minerals Blush Brush 
As I've said, I haven't found the perfect contour brush, but this one from Bare Minerals is definitely my favourite so far for a deeper contoured look. As it's smaller in size you can be more precise with it yet it's still fluffy enough to really buff in the product. 


Real Techniques Blush Brush 
I love this brush for blush, as it's so soft and buffs in  the product seamlessly. I also use it for bronzer sometimes, but  the duo fiber is still my overall favourite for bronzer. 

Urban Decay Powder brush 
This brush is literally the softest brush you will ever feel (if you've found softer, tell me)! It's really good to use for powder and to just generally buff over your face to smooth everything out, or to just feel how heavenly it is... 

Real Techniques Miracle Sponge
The only sponge I've ever tried, but I love how easy and quick it is to blend concealer with it, especially under the eyes. 

Bare Minerals Fan Brush 
This is such a great brush for highlighter, as it's a smaller brush so it just hits the cheek bones and doesn't leave you with a huge streak of shimmer just chilling there on your face. 

Real Techniques Domed Shadow Brush 
This is supposed to be an eye shadow brush, but I cannot use this for eye shadow at all as it's just too dense. This does however make it ideal for concealer on the face. I also like to use it around the eyes, along side the Real Techniques sponge, just on the inner corner, as it's more precise and easier to use in tiny areas. 

I hope thats given you some brush'spiration... I'll be posting a second instalment to my holy grail brushes soon, to talk about my favourite eye brushes, so keep your eyes peeled! 


Tuesday, 15 October 2013

REVIEW | REAL TECHNIQUES MIRACLE COMPLEXION SPONGE


Before we get into this review, lets just have a little, 'I can't believe how quick this year is going' rant. When I first saw that Real Techniques were bringing out a 'miracle complexion sponge' in September, it seemed like ages to wait, but somehow September has now come and gone and here we are, mid October and the proud owners of two Miracle complexion sponges. 

Okay back to the review! 


The Miracle Complexion Sponge was on a buy one get one half price offer the first time that we saw it in a Boots store, so obviously we both grabbed one each. Neither of us have ever used any kind of sponge before and instead use the Real Techniques Buffing brush or the Expert face brush, so we can only compare it against using a brush.


Real Techniques describe this sponge as a 3-in-1 product:


  • "Rounded sides blend large areas of the face with a repeated dabbing or “stippling” motion.
  • Precision tip covers blemishes and imperfections.
  • Flat edge for the contours around the eyes and nose."

  Although they give all of this information about which part to use for which function, we both tend to mainly use the large flat edge as it makes the application even easier and quicker to apply as it's a large surface area and can quickly cover the face.
To use the sponge you have to wet the sponge so that it expands and then squeeze all of the excess water out. This is also beneficial when you're applying the foundation as it feels very refreshing on the skin and keeps the skin feeling fresh and hydrated, especially when you're applying concealer under the eyes. 
The sponge gives a really flawless finish and can give full coverage if you repeatedly pat the sponge onto your face, as you would a stippling brush, when 'stippling.' One of the main things we love about the sponge, is that it doesn't leave any lines un-blended, like brushes can often tend to. 
Both of us now always use the sponge over our foundation and concealer brushes as you get a much more flawless finish and it's also so easy and quick to use. We still need to try it out with other products, such as cream blush, which I'm sure it will also apply beautifully! The sponge is also especially good to use for contouring with cream or liquid products as you can easily apply the contour or highlight precisely to the area which you want to enhance or sculpt more. We both much prefer using the sponge to contour and then we use brushes to apply the powder over the top to either set the cream/liquid products or enhance the contour or highlight more. 

Have you tried the Miracle Complexion Sponge? How does it compare to the original Beauty Blender? 


Sunday, 29 September 2013

BOOTS HAUL + MINI REVIEWS

Lately I've really been making an effort to save my money which resulted in my makeup bag looking depressingly low and in need of some new purchases. The only solution to this - a little make-up only shopping trip!


The foundation, mascara and powder were all repeat buys and so I could be safe in the knowledge that they would perform as well as before, however the rest of my purchases were new to me and I have some mixed feedback.  

Having just used up a mini Benefit Chacha Tint I was looking for a more affordable replacement and found this new Rimmel liquid cheek tint. The texture is thicker than what I would class as liquid compared to the Benefit tint however this is not a set back. The tint is very light weight which means that the colour can be built up and would therefore be a great fit for lots of skin tones. The tint comes in two shades; Pop of pink and Sun kissed  Cherry which although limited choice, the two colours are great colours considering this as the Pop of pink is a great pink blush and the Sun kissed Cherry is more of a coral tone, which are generally the most popular blush colours. 

The tint gives a good colour to the cheeks however, I also use a powder blusher over the top to intensify the pigment. I like to use Coralista by Benefit over the tint to also add a little shimmer. 

For the last few months beauty blenders have taken my interest and so when Real Techniques brought out their miracle complexion sponge I had to try it. There was a buy one get one half price offer on, so obviously Georgia and I had to both get one to take advantage of the offer.  A review will soon be up after we've both tried it out a bit more.


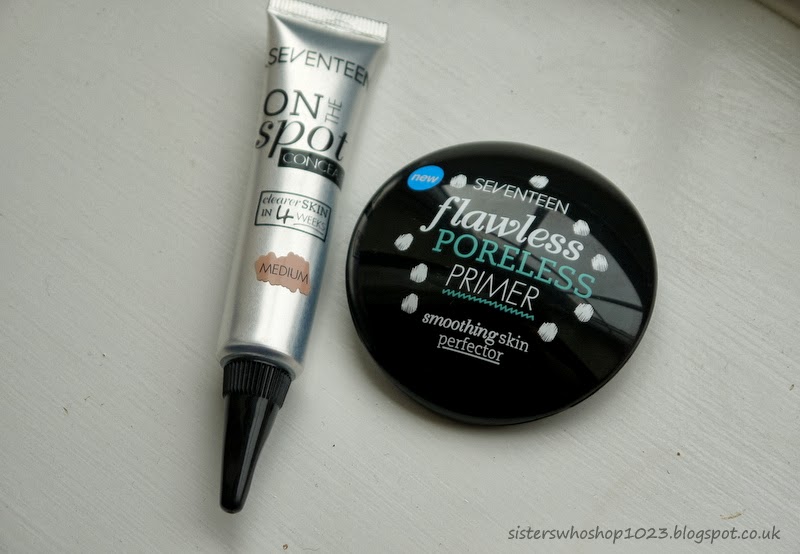
Finally, these are my first Seventeen make-up purchases, and it was the packaging of these products that enticed me to buy. I have never really used a primer before, so I didn't really know what to expect, however, I have been consistently using this primer for the last week and it does what it says. Your skin feels super soft while it being very light weight and is also moisturising which means that foundation applies even more smoothly. Very little of the product is needed with each application and so I can predict this lasting a good amount of time. 

However, the On the Spot concealer was very disappointing. It is described as having a creamy texture, however, the concealer is extremely watery even when shaken which means that the coverage leads much to be desired. 

Although I cannot comment on the statement of 'clearer skin in 4 weeks' as I have not been using it for that long, I will not be buying this again and doubt I will even be using it for 4 weeks. The colour is a very unusual shade that almost looks slightly dirty and is very difficult to blend into the skin even with using Real Techniques stippling brush and so I have taken to applying the concealer before my foundation just to hide the difficult to blend colour. 


So, that was my little stock up of make-up and I can definitely say that my make-up bag now looks a lot more healthy! 


Have you been stocking up on make-up lately, were there any products that you loved or didn't think too much of? 


Friday, 14 June 2013

NAVY BLUE SMOKEY EYE MAKE UP


I've mentioned the Sleek ultra mattes palette, many, many times before on this blog as it's such a great and handy palette. In my review of the palette, (which you can read here), I only used the neutral brown, safe colours, in my make up look and I'm always using them on a day to day basis, however the blues in the palette were in pristine condition and were just sitting there feeling sorry for themselves, so I decided to be more adventurous and give them a go! 


 I really like a navy smokey eye; normally I'd add a lot more black to it, so the navy is more of just a hint of colour in the look, however this look is a lot more blue. I think this is a really nice look for a night out or special evening, either if you want to change your usual black smokey eye up a bit or if you find black too harsh. 


 I kept the eyeshadow just above the crease, as any higher and I think this would have looked too heavy on the eye. This is also why i've done my eyeliner fairly thin on the top lash line. I added the black eyeliner in the water line to give the eye more definition, so that it wasn't overpowered with too much blue.


I've kept the rest of the make up natural as otherwise I think it would just look too much and it doesn't distract away from the eyes being the main feature of this look.
 

The colours that I used are numbered below, I also used;
-MUA jet black eyeliner
-Benefit They're Real Mascara
-Bourjois Healthy Mix foundation
- Rimmel Stay Matte powder  
-Collection 24hr felt eyeliner in black
- Revlon lip butters in Papaya and Sweet Tart (review and swatches here)
- MUA Brow Kit
- Maybelline The Eraser concealer (review here)
-Bourjois bronzer (review here)
- MUA blush


Thursday, 13 June 2013

REAL TECHNIQUES - LIMITED EDITION BRUSHES


If you haven't heard of Real Techniques brushes by Samantha Chapman and you're reading beauty blogs, well I just don't know where you've been - even my boyfriend knows who Sam and Nic are, due to me going on about them so much! 


The previous brushes that Sam has released are all amazing and I'm really not sure what I used to do without them; they really do make applying make up so much easier, quicker and smoother.

The brushes were released in America a few months or so ago and I think they only came to the UK, May this year. I knew immediately that I needed these brushes, especially as they're limited edition -  a girl can never have too many make up brushes!


I was blown away by the original Real Techniques brushes and how soft they are, however, I'm pretty sure that these brushes are even softer! It's okay to just sit and stroke these, I'm sure... 

The brushes are duo fiber which allow you to easily apply a lighter application, which you can build upon. They are also really good at blending, therefore, leaving a beautiful smooth and even finish.

The set includes three brushes; face brush, contour brush and eye brush. I thought it was a nice touch that although the brushes are white, unlike the previous brushes, the colour of the writing on them matches the previous colour codes. For example the eye brush writing is purple and all of the eye brushes in the collection have purple handles. 

I was most drawn to the contour brush as, although I like the contour brush that comes in the 'Core Collection' set, I sometimes find that it doesn't blend the product too well and this duo fiber one looked like it would be better suited for the job.


The brushes can be used with cream, liquid or powder, so far I have only used them with powder products and they are really great to work with, I will definitely be trying them out with liquids and creams soon.  They are synthetic, therefore cruelty free and hand-cut, which makes them seem extra special. I really love these brushes and the Real Technique brushes are the only ones I use now, I would recommend to anyone!


You can purchase these brushes for around £23.99, online on the Boots website, or other websites, such as Feelunique and Look fantastic.(Free worldwide delivery).

Have you tried these brushes or any other Real Techniques brushes?


Saturday, 8 June 2013

SLEEK ULTRA MATTES PALETTE & MAKE UP LOOK


 I'm just going to get straight into this one, I love this palette! It's just a good all rounder, that is so versatile. I like to use it when I want just an easy natural look or smokey eye, as shown in the photographs above. But I also love it for the other colours, like the reddy brown and the purples, which I previously wrote about in an eye make up look on the blog, here. I haven't used the blues yet but they are great shades of blues and not too 80's!  I also like to use the palette in conjunction with other shadows that have some shimmer, as I like to define the eye more with matte shades.

The Sleek palette's are well known for their great pigmentation; they're so creamy and give a really vivid colour pay off, so you don't have to spend ages building the colour up. They don't crease at all and they stay on for longer than you would ever need your make up to stay on. The black especially really stands out for me as a good matte black is an essential element of any make up kit and this one is great; it's such a strong shade and the smallest amount of product gives off a really dark jet black shade.

I've numbered the shades that I used for the above make up look and in order. Shades 1 and 2 were used as base colours, 3 all over the lid and through the crease and 4, the black, used along the lash line and outer corner and 5, the white as a highlighter under the brow. The lip colour is by MUA, and featured previously on in a review on the blog, here.  

I've read reviews that the applicatior that you get with this palette is pretty good, as they go but I prefer to use the Real Techniques eye brushes as they're so easy to blend with. 

 I would definitely recommend the Sleek palettes and for £7.99, they won't make your bank account cry. You can buy Sleek products from Superdrug or the Sleek website.


I'm looking forward to trying out more of the Sleek palettes, which ones would you recommend?


Thursday, 30 May 2013

SMOKEY CAT EYE MAKE UP


 Hannah asked me to do her make up for a 'date night' with her boyfriend. She wanted a darker look which defined the eyes. I think this is a nice look for a darker eye look, as it's still dramatic, however it doesn't overpower the eye and isn't too heavy as the dark colour is only in the outer corners and flicks out, leaving the socket of the eye quite light and fresh still.
 Hannah's eye shape is really good for this style of make up, which makes it easier to do on her, where as my eye shape doesn't make the eye shadow easily go in this flick shape, as I think mine are more round.

 This eye make up would suit any eye colour, blue eyes especially really make the black of the shadow stand out, as it's such a contrast of light, bright blue eyes to the dark black make up.


Products used:
- MUA undress me too palette
- MUA undress me palette
- MUA Glamour nights palette 
- Benefit, They're Real mascara  
- Rimmel Gel liner 
- Real Techniques brushes - Starter set 


Blog design by srslydsgn | 2014 | all rights reserved